Users Overview
Note
This article relates to both the TM2 and TM3 versions of the desktop software.
Note
Please be aware only System Administrators can access the Users tab
The Users section will allow you to use different search fields to help you locate users that log into your TM2. Users search is at the top of the user's section. From here users can search for a user(s); to search for a user, populate one of the search fields and press the Search button. To quickly remove the data you have entered into the search fields, click the Clear button.

There are different search parameters users can use:
- Location - when a user clicks on the locations field it will open a drop-down allowing the user to filter by location. If no location or All my locations is selected it will show users for all locations.
- Type - when a user clicks on the type field it will open a drop-down allowing the user to filter by the account states. An account can either be Current or Non-current. A current user is a user that is using your TM2 at present. A non-current user is a user who has used your TM2 in the past and can no longer log in.
Info
Please take note - user accounts cannot be deleted in TM2
- User - this field allows a user to enter text or numbers to search for a specific user(s).
The next part to the user's section is how to sort user accounts, as previously mentioned. Users can sort user accounts in different ways. One of which is to Drag a column header to the grey area to sort the records. Column headers are such things as Role, Location etc.
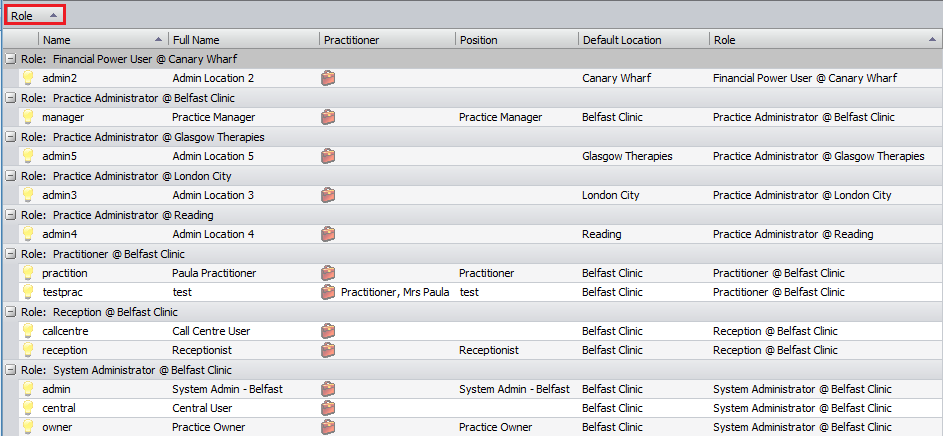
Using this method a user can add more than one search parameter. The example above is sorting the user accounts by their Role. This will group the user accounts for the role they are assigned. To remove this search drag and drop the selections anywhere below the grey space.
Another way of sorting the users is by clicking on the column header. This will sort the user accounts into ascending order on the first click and descending order on the next click. Using this method you can only sort one column at a time, wherein the first one you could sort multiple columns. A user can tell what column(s) are being sorted by the arrow on the column header. When it is an up arrow it is sorted in ascending order and down signifies a descending order sort.
 - this means the account is Current.
 - this means the account is Non-current.
If a user wants to add a new user, they can do this either by clicking the white page on the top left

or by right-clicking in the white space and select new.
You can also edit user accounts by right-clicking on them and select 'Edit' or by double-clicking on the user.
Info
Users cannot edit their own account and only System Administrators can make changes to user accounts.
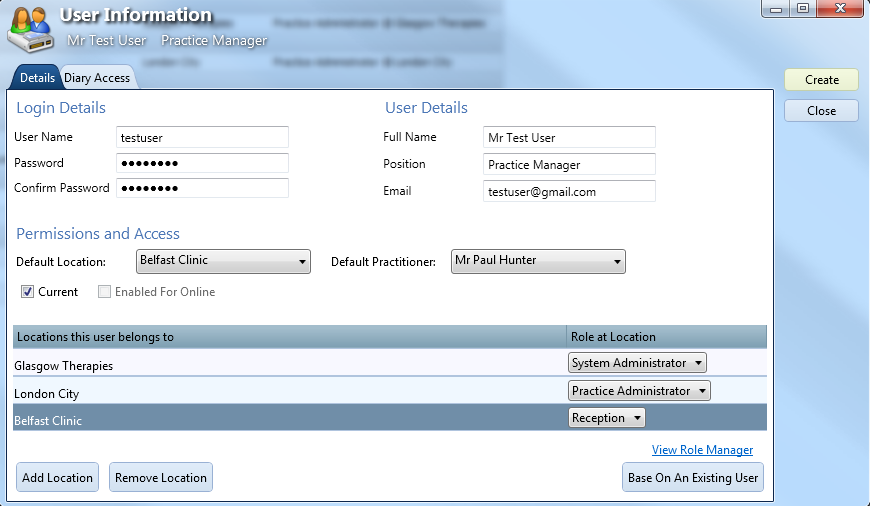
User Name - this is a unique field and is the username the user will use to log into TM2. Once your user account is created you will be unable to edit your username. This is not an optional field.
Password - enter the user's password for TM2. This can be changed after the account is created.
Info
Please take note - Our Technical Support Team cannot change or tell you your password. A System Admin can only reset your password.
This is not an optional field.
Confirm Password - the user's password must be reentered. This is not an optional field.
Full Name - enter the user's full name.
Position - enter the user's role at the clinic.
Email - enter the user's email address.
Default Location - set the default location that the user will be logging in from.
Default Practitioner - if the user is a practitioner in your clinic then select their practitioner record from the drop-down box.
Current Checkbox - if this user is a currently employed and using your TM2 this box needs to be ticked. If you wish to deactivate a user account then untick the checkbox. This box will be automatically ticked when creating a new user.
Enabled For Online Checkbox - tick this checkbox if you want to allow this user to have online diary access.
Add Location - as well as the default location, when creating a new user account you will be allowed to add additional locations for the user to have access to. If a user cannot view a particular diary at a location they may not be set up for it. To remove a location, click on the location and click Remove Location.
Role at Location - it is important to select the correct role for each location. Different roles have different levels of access. Please see the user levels guide here.
Diary Access Tab - this is part of the role manager module - please see this guide for more information.
Info
You are unable to edit your own user account (read-only). If you need any changes made to your user account please contact a System Administrator at your clinic.