Payments Overview
Note
This article relates to both the TM2 and TM3 versions of the desktop software
Info
Please be aware only System Administrators, Financial Practice Admins, Financial Power Users can access the Payments tab
The Payments section will allow you to use many different search fields to help you locate payments efficiently and what method of payment was used. You can also add/remove the payment methods in TM2 options. Payment Search is at the top of the payments section. From here users can search for payment(s); to search for a payment, populate one of the search fields and press the Search button. To quickly remove the data you have entered into the search fields, click the Clear button.

There are different search parameters users can use:
- Date - these fields allow a user to enter a date range. Depending on the date range entered it will show all payments created on or between the entered dates.
- Amount - this field will allow the user to enter a certain amount and return payments that total to or between the amount entered.
- Method - when a user clicks on the status it will open a drop-down allowing the user to filter by the method of payment used. There are 6 default methods to choose from Bank Transfer, Card, Cash, Cheque, Direct Debit and Standing order. As mentioned above you can add your own methods of payments and remove the default methods within TM2 options. If nothing is selected it will show all payments.
- Location - when a user clicks on the locations field it will open a drop-down allowing the user to filter by location. If no location or All my locations is selected it will show payments for all locations.
- Reference - this is the unique number every new payment is assigned when they are created in TM2. Reference numbers are added in order i.e. the first payment added will be number 1 and the second will be 2 etc. If a user searched for reference number 11, TM2 will return the payment that has the reference number 11 assigned to it.
- Lodgement Reference - this is another field that a user can use when lodging money in the clinics account. If you want to keep track of cash/cheques being lodged into the bank you can enter a lodgement reference in the payment window. To access this window, search for the payment and double-click on it. When you have entered a lodgement reference number click update.

There are also many other important features within the payment window. There are several fields you can edit, such as Income Reference, Payment Date, Payment Method, Paid By and Lodgement Reference. For any of the changes to take effect, you must click Update.
Reconciliation - when the user clicks this button a drop-down window will appear below showing the reconciliation process. The user will be able to change the reconciled amount if the patient/group payment was underpaid. This will also change the payment amount on the invoice they payment is linked to.

Print - when a user clicks this button it will show a drop-down menu with Print and Email. The user will be able to print a payment receipt or send an email with the payment receipt attached.
Letters - when a user clicks this button it will bring them to the patient/group's letters section. It is important to note that this letters section is different from the letters section when accessed in the patient file and this one is linked to payments.
Delete - when a user clicks this button it will alert them that they are about to delete a payment from TM2. If they proceed with this action it will permanently delete the payment and remove it from any invoice/account it is linked to.
New Card - this will allow the user to add credit/debit card details for the patient/group.
Warning
It is not recommended you store card details in a PMS
Update - this button will allow the user to save any changes made to the payment.
Cancel - this button will allow the user to cancel any changes made to the payment after the last time the Update button was used.
The next part to the payments section is how to sort payments, as previously mentioned. Users can sort payments in different ways. One of which is to Drag a column header to the grey area to sort the records. Column headers are such things as Account name, Status etc.
There are 3 payment statuses - Reconciled, Part Reconciled and Unreconciled. You cannot search by this field but you can filter them by using the Drag a column header feature. This is a great way to quickly find unreconciled/part reconciled payments.
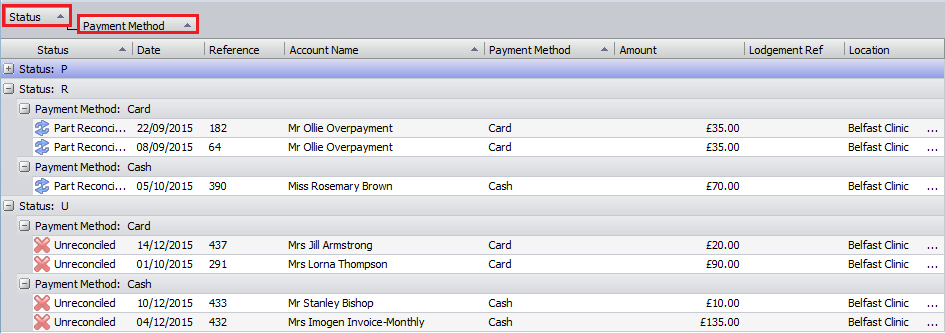
Using this method a user can add more than one search parameter. The first sort was to sort by Status, in this instance the user was wanting to find all part reconciled/unreconciled payments. The user then wanted to find all cash/card payments so the Payment Method column was also used. To remove this search drag and drop the selections anywhere below the grey space.
Another way of sorting the payments is by clicking on the column header. This will sort the payments into ascending order on the first click and descending order on the next click. Using this method you can only sort one column at a time, wherein the first one you could sort multiple columns. A user can tell what column(s) are being sorted by the arrow on the column header. When it is an up arrow it is sorted in ascending order and down signifies a descending order sort.