Groups/Businesses Overview
Note
This article relates to both the TM2 and TM3 versions of the desktop software
Note
If you have just added a new group and it is not appearing on the patient record when adding - try resetting your TM2/TM3 first.
The Groups section of TM2 (If you are using TM3 web/desktop, groups are identified as "Businesses") contains all information on the medical groups associated with a user's practice. Like most other sections of TM2, there is a search bar at the top of Groups. This search behaves like all the other searches in TM2. Users edit the options on the search bar and click Search or press Enter to perform the search.

When a search has been performed the list of groups will appear as below.

When the plus box to the left of a groups record, is clicked that group will expand and show what patients belong to that group.

The Drag a column header to group... option is available in the Groups section. This search will group the records by whatever column name is selected.

When right clicking on the Groups section some different options are open to users. The Edit Group and Expand Patients options will only edit or expand the selected group. Letters and Emails will send a communication to the group. Set up in Letter Templates section of TM2.

When New Group is clicked the following pop up will appear. The top half of this window contains the information about the group. The boxes that are 'greyed out' and will become available once the group has been set up.
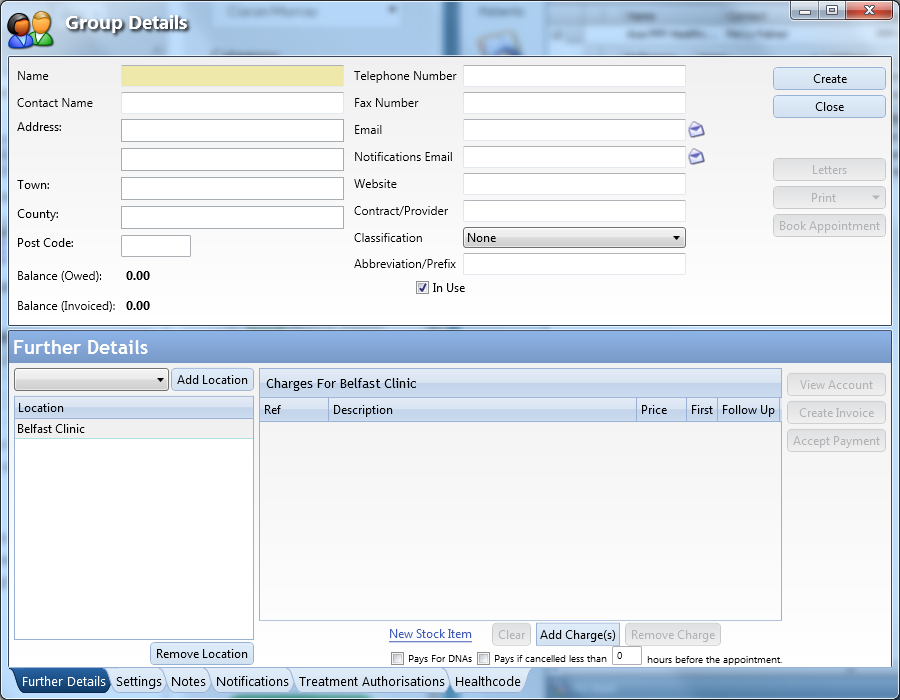
The more complicated information comes in the bottom half. This is where information about charges and cancelation fees are set. In this instance, the Belfast clinic charges are to be set. If a user wanted to add charges for a different group, the dropdown beside Add Location is selected and then Add Location is clicked to add that clinic.
When the Add Charge(s) button is clicked the following pop up will appear. From here users can choose to add charges associated with each group. These are usually an initial assessment and follow up consultation. Multiple selections can be added at the same time by holding the Ctrl key and choosing charges to add.

When the charges have been added they will appear in the charges section of the Group Details screen. It is of the upmost importance to change the first and follow up buttons, highlighted in red. This will tell TM2 to charge a follow-up appointment at the reduced price, rather than the increased initial assessment.

New Stock can be added here by clicking the appropriate button and adding the stock as previously explained here. The tick boxes for Pays for DNAs and Pays if cancelled less than... can be ticked if necessary. The correct amount of hours will need to be added here also.
Clicking on different tabs on the Group Details pop up will give different options to users. The tab that is active will be highlighted in dark blue.

The Settings tab contains information on the invoices that will be sent out. The different invoice settings are available on the drop-down boxes. The tick boxes available on this tab can be clicked if they are relevant to the set up of the group.
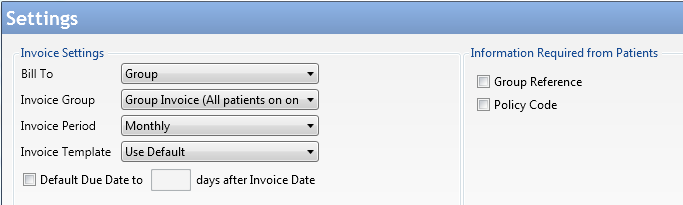
Bill To options:

Invoice Group options:

Invoice Period options:

Invoice Template options:

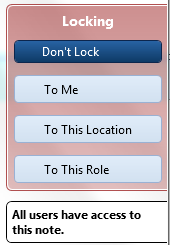
Notes can only be added to the group, once the group has already been created. When the Add button on Notes is clicked this pop up will appear. Typing in the white space will add a Note. The date of the note can be edited using the calendar at the top and it can also be set as an alert by clicking the alert tick box.

On the right-hand side, there is an option to Lock the note. When the options for locking the note are clicked there is a change of the information below.


The Notifications tab will subscribe groups to notifications about different appointment options. These can be ticked if they are needed.

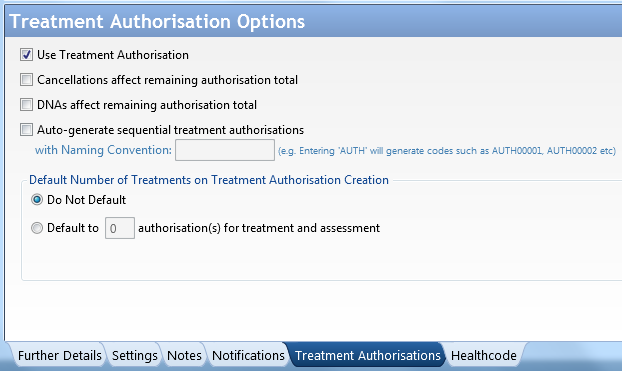
Treatment Authorisation tab will set up some settings for the group. These options will be known to the clinic beforehand. Using the tick boxes in this tab, treatment authorisations can be set up for each group.
Healthcode allows you to send your private medical insurance bills electronically and process bills for virtually every medical insurer. More information about Healthcode can be found here. Take note of the red text, this appears where the tick box is active.

When Add New is clicked this pop up appears. The codes for Healthcode are set here along with the provider number and location. When the selections are correct click OK to add this to the Healthcode tab.
