Creating Letter Templates in TM2
Note
This article relates to both the TM2 and TM3 versions of the desktop software.
Creating Letter Templates with TM2
Within TM2, there is a flexible and easy way of creating your own letter templates to produce standard letters and mail merges. TM2 is not tied to any third party word processing software so you do not need any special tools or applications in order to use TM2 Letter functionality or to update or create Letter Templates. There is an interface in TM2 called Template Designer, which allows templates to be easily edited or created. As Templates are just text files, you can use your favorite word processor to edit them should you prefer.
Accessing the Template Designer
You can complete letters from different sections of TM2. The 'Template Designer can be accessed from the following areas 'Patient', 'Customer Group', 'Medical Contacts', 'Cases' and finally the 'Invoice' section. Once you have view one of the listed forms you need to click on the 'Letters' button to access the 'Template Designer'
Editing and Creating Templates using Template Designer
First off, bring up the template designer, this can be done from any Communications form (although you need to be a System User.)
Click the template options button:

Then select New or Edit Template from the drop-down menu. Template Designer should appear.
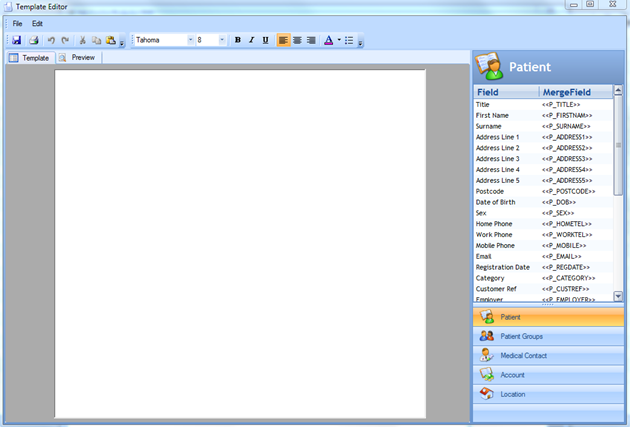
If you are familiar with any of today's Word Processing packages, then the Template Designer shouldn't look too daunting. It defaults to the template view, where you can type any template text you wish.
There is also a panel on the right, which changes depending on which button you click on it. This panel makes adding merge fields really easy. Simply type the body of your template, and when you need a merged field, simply drag from the "Field Column" to where you want it in your template. Your mouse cursor will change to a drag cursor, which will help you quickly identify where in the text the merged field will be inserted.
Editing Templates manually
Within TM2, all letter templates are held centrally, usually on the Server PC and accessed from every networked PC when needed.
By default, the letter templates are held in the folder
C:\Program Files\bluezinc\tm2\templates
(the drive or folder structure may differ on your system depending on your PC configuration or your installation settings)
Within this folder, there are a number of other folders each of which holds the templates for the object of that name, e.g. the patient's folder holds all letter templates which are available from the Letters button on the Patient Information form.
Info
All templates under the Patients folder are also used for the Mail Merge option within the Patient List function of TM2.
What format are the templates?
TM2 Letter templates are in a format called Rich Text Format (or rtf for short). This format is a standard generic format on Windows platforms and is recognisable by all main Word Processors and Document Editors without conversion.
Nearly all formatting requirements that you may have for a letter template can be used within a Rich Text Format document, including fonts, colours, images, links to other files, tables etc.
One thing to note with RTF files is that the Margin settings may not be predictable on the final document. This is because page sizes are not explicit, and the document will resize to whatever is necessary for the optimum format. This should never cause a problem in using RTF documents.
You can choose to print a standard letter from different parts of TM2. You have an option to print letters from Patients, Medical contacts, Patient Lists, Cases, Diary Events, Invoices, and Payments.
Example: Patient Communications
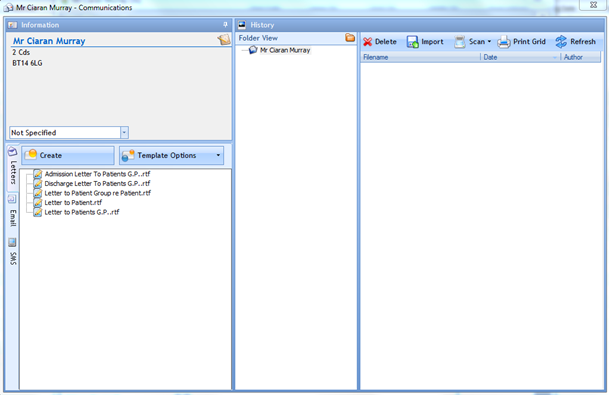
From the Patients form press the 'Letter' button. This will open the Patient letter templates.
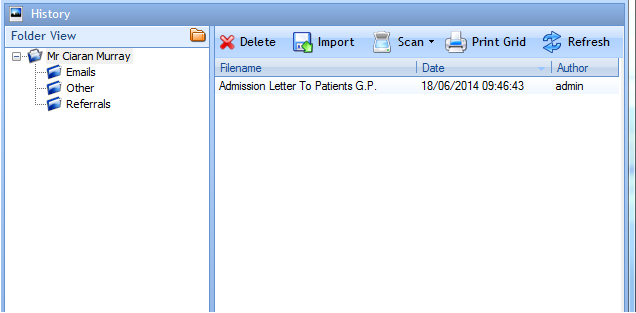
The form is split into two columns, on the left is a panel at the top displaying information relevant to the current patient, below that is a set of tabs with the "Letters" tab selected by default (assuming you clicked the Letters button).
On the right is the History section, which details all communications with a patient whether Letter, Email, SMS or any other item that you may wish to add. There is also a Folder View - which allows fast and easy categorisation of communications. e.g. You could put all communications regarding a specific case into a separate folder. For more information on the History Section, click here.
On the letters tab are two buttons, a "Create Button" and a "Template Options" button, which is only available to System Users. Below it is a list of available templates, if you have no templates available, check out "setting up your base directory" in Folder Settings.
Creating a Merged Letter
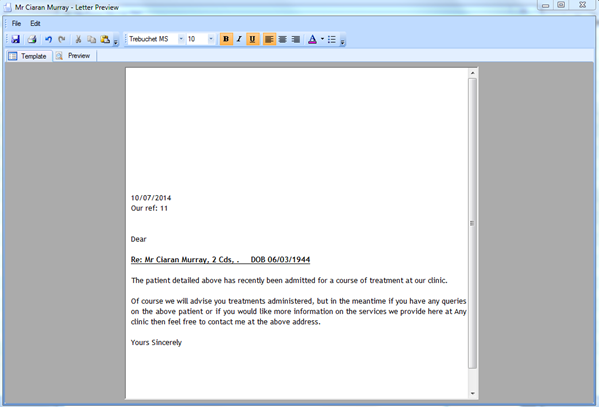
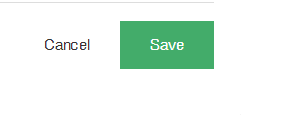
You can either select a template from the list and click the Create Button, or Double-click the template on the list. This will bring up a preview window as shown below. What has happened in the background is that TM2 has loaded the current patient information into one of the templates. You can edit the letter in any way you need to, and then print it or save it.
When saving or printing, you will be asked if you want to add the letter to the communications history. This will add it to the selected folder on the folder view.
The history section will then contain the new letter.
Other types of letters
In TM2 there are many different places that you may wish to print letters from, these are listed below. The procedure for printing/previewing a letter or editing a template is the same regardless of how you arrive at the communications form.
- From the Case, history form select the print letter button and this will open the communications form.
- From the Invoices form press the 'Letters' button, this will open the communications form.
- From the Diary form press the 'Letters' button, this will open the communications form.
- From the G.P.s/Consultants form press the 'Print' button, this will open the communications form.
- From the Patients group form press the 'Print' button, this will open the communications form.
- From the Suppliers form press the 'Print' button, this will open the communications form.
Mail Merge
Within TM2, nearly all relevant data fields are available as Merge Fields. Adding and using Merge Fields within your templates is easy, and if you have opened an existing template before, you will probably understand how they work already.
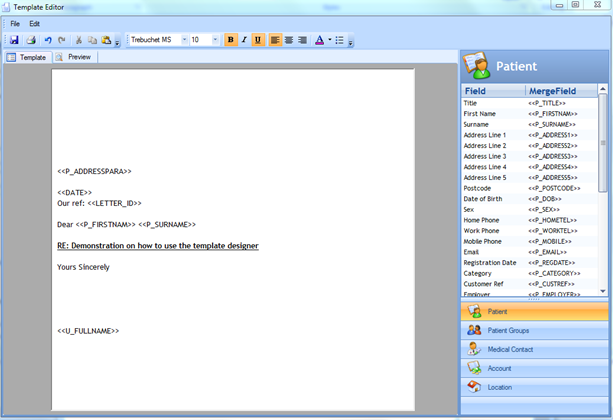
An important note to start with is that TM2 merge fields are NOT special system merge fields in any way. In many word processors, merge fields are embedded database links and need to be created by inserting special characters and using specific functions within the Word Processor. TM2 templates simply use the symbols << and >> surrounding a merge field and they are typed in as part of the text in the document. TM2 then translates these into real data whenever the template is used.
For example, when creating a Merge Field to display the first line of a Patient's address, you type in <<P_ADDRESS1>> along with the rest of your letter template text.
What happens if I get a Merge Field wrong?
There is no danger in trying out new templates, even ones with mistakes. We recommend that all templates are tested in your training database. This way, you won't create unwanted letters in your live Letter Store.
When TM2 reads a template, if it finds a Merge Field which it doesn't recognise, it adds the text 'Merge Field not found' in the resulting letter, so it's easy to see if the Merge Field is working or not.
Creating a mail merge letter template for TM2 using Microsoft Word
Enter your text as normal and when you are entering a merge field don't forget to put << at the start and end of the merge field >>, i.e. for patients forename <<P_FIRSTNAM>>. A list of all the merge fields is included in this document.
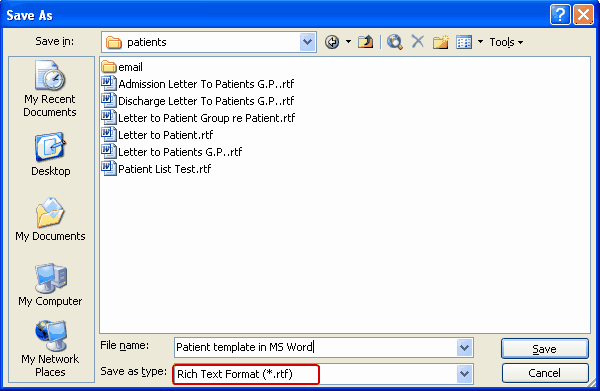
Saving letter templates in MS Word.
As letter templates must be saved in Rich Text Format (rtf), this needs to be changed (as by default it will be selected to a word document (*.doc) format) to rtf. Click on the drop-down box (Save as Type) and select Rich Text Format from the list.
As the letter template has been created outside of the TM2 application, it is important that your letter template is saved to the correct area. When saving letter templates it must be saved to the following area: \\NINPHFS01\Templates\..
Within this folder, there are a number of other folders each of which holds the templates for the object of that name, e.g. the patients folder holds all letter templates which are available from the Letters button on the Patient Information form.
How Will I know if I have saved my template to the correct folder?
When you are saving your letter, you will see other letter templates and also an email folder.
My Letter template is not working in TM2
When you run your letter template and you find that not all of your merge fields display. The easiest thing is just to edit the template in TM2, replacing the non-working merge fields with new ones.
Full Merge Field List
The following tables show the full Merge Field list for TM2. The first one shows which Merge Fields can be selected for each of the objects that you can create templates for. Note that not all Merge Fields can be used in all circumstances, but only when relevant. e.g. when creating a template for a Patient, it doesn't make sense if you include Supplier Merge fields because there is no direct relationship between the two.
| Letter Type | Can use Fields for... |
|---|---|
| Patient | Patient, Patient Group, Medical Contact*, Account, Practitioner *Note for Medical Contacts, the system will select information on the Default Medical Contact only |
| Patient Group | Patient Group only |
| Medical Contact | Medical Contact only |
| Appointment | Appointment, Patient, Practitioner |
| Case | Case, Patient, Practitioner |
| Invoice | Invoice, Account |
All letters can see the Miscellaneous Fields.
Customer Groups
| To display information on... | Use Field... |
|---|---|
| Name | O_NAME |
| Contact Name | O_CONTACT |
| Address Line 1 | O_ADDRESS1 |
| Address Line 2 | O_ADDRESS2 |
| Town | O_ADDRESS3 |
| County | O_ADDRESS4 |
| Post Code | O_POSTCODE |
| Telephone | O_TEL |
| Fax | O_FAX |
| O_EMAIL | |
| Web Address | O_WEB |
| Contract Number | O_CTRACTNO |
Accounts
Every Patient and Patient Group has an account containing their balances.
| To display information on... | Use Field... |
|---|---|
| Name | ACC_NAME |
| Balance Invoiced | ACC_BAL_INV |
| Balance Owed (includes un-Invoiced items) | AA_BAL_OWED |
Appointment
| To display information on... | Use Field... |
|---|---|
| Reference | A_REF |
| Start Time (HH:MM) | A_START |
| End Time (HH:MM) | A_END |
| Customer Name | A_NAME |
| Status | A_STATUS |
| Duration | A_MINS |
| Name | ACC_NAME |
| Comment | A_APPCOMM |
| Date of Appointment | A_DAY |
Cases
| To display information on... | Use Field... |
|---|---|
| Date of Admission | C_ADMDATE |
| Referral Reason | C_REASON |
| Diagnosis | C_DIAG |
| Diagnosis Code | C_DIAGCODE |
| Date of Discharge | C_DISDATE |
| Patient Outcome | C_SOUTCOME |
| Practitioner outcome | C_OOUTCOME |
| Discharge Status | C_DSTATUS |
| Number of Appointments | C_NUMAPPTS |
| Reference | C_CASEREF |
| Admission Code | C_ASTATUS |
| Review Date | C_REVDATE |
| Refferal Date | C_REFDATE |
| Body Site | C_BODYSITE |
| Recurrent? | C_RECUR |
| Trauma? | C_TRAUMA |
| Chronic? | C_CHRONIC |
| Time Injury Present | C_TIMEPRES |
| Practitioner outcome | C_OOUTCOME |
| Units for time present | C_TPUNIT |
| Injury Cause | C_CAUSE |
| Pre-existing Conditions | C_PREEXIST |
| Pain Scale at Admission | C_APAIN |
| Admission Letter Date | C_ALETTER |
| Pain Scale at discharge | C_DPAIN |
| Discharge Letter Date | C_DLETTER |
| Clinic Notes | C_NOTES |
Practitioners
| To display information on... | Use Field... |
|---|---|
| Name=Title + Forename + Surname | P_CONSNAME |
Patients
| To display information on... | Use Field... |
|---|---|
| Forename | P_FIRSTNAM |
| Surname | P_SURNAME |
| Title | P_TITLE |
| Date Of Birth | P_DOB |
| Gender | P_SEX |
| Address Line 1 | P_ADDRESS1 |
| Address Line 2 | P_ADDRESS2 |
| Address Line 3 | P_ADDRESS3 |
| Address Line 4 | P_ADDRESS4 |
| Postcode | P_POSTCODE |
| Home Telephone | P_HOMETEL |
| Work Telephone | P_WORKTEL |
| Mobile Telephone | P_MOBILE |
| P_EMAIL | |
| Enquiry | P_EXQUIRY |
| Registration Date | P_REGDATE |
| Category | P_CATEGORY |
| Reference | P_CUSTREF |
| Employer | P_EMPLOYER |
| Group Reference | P_GROUPREF |
| Height | P_HEIGHT |
| Weight | P_WEIGHT |
| Hospital Number | P_HOSP_NUM |
| NI Number | P_NI_NUM |
| Insurance Number | P_INS_NUM |
| Medication | P_MEDICATN |
| Previous Injury | P_INJURY |
| Notes | P_NOTES |
| Clinic Notes | C_NOTES |
| Fullname= Title+forename+surname | P_FULLNAME |
| Full Address, concatenated address in a line with commas | P_ADDRESSLINE |
| Full Address, concatenated address, 1 line per line | P_ADDRESSPARA |
* The system will automatically select the currently defaulted address for the patient
Medical Contacts
| To display information on... | Use Field... |
|---|---|
| Forename | D_FIRSTNAM |
| Surname | D_SURNAME |
| Business Name | D_SURGERY |
| Address Line 1 | D_ADDRESS1 |
| Address Line 2 | D_ADDRESS2 |
| Address Line 3 | D_ADDRESS3 |
| Address Line 4 | D_ADDRESS4 |
| Postcode | D_POSTCODE |
| Telephone | D_TEL |
| Fax | D_FAX |
| D_EMAIL | |
| Web | D_FAX |
| Contact Category | D_CATEGORY |
Payments
| To display information on... | Use Field... |
|---|---|
| Reference | R_REF |
| Date | R_DATE |
| Paid By | R_PAIDBY |
| Amount | R_AMOUNT |
| Notes | R_NOTES |
| Card Type | R_CARDTYPE |
| Card Number | R_CARDNUM |
| Contact Expiry | R_CARDNUM |
| Card Expiry | R_EXPDATE |
| Cheque Number | R_CHQNUM |
| Payment Method | R_PAY_TYPE |
Invoices
| To display information on... | Use Field... |
|---|---|
| Reference | I_INVID |
| Addressee | I_INVNAME |
| Address Line 1 | I_ADDRESS1 |
| Address Line 2 | I_ADDRESS2 |
| Address Line 3 | I_ADDRESS3 |
| Address County | I_ADDRESS4 |
| Postcode | I_POSTCODE |
| Invoice Date | I_INVDATE |
| Due Date | I_DUEDATE |
| Reminder Date | I_REMSENT |
| Second Reminder Date | I_SECNDREM |
| Date Fully Paid | I_PAIDDATE |
| Total Ex Vat | I_TOTALEXVAT |
| Total VAT | I_VAT |
| Grand Total | I_TOTAL |
| Amount Paid to date | I_AMOUNTPAID |
| Status | I_STATUS |
Suppliers
| To display information on... | Use Field... |
|---|---|
| Name | S_NAME |
| Contact Name | S_CONTACT |
| Address Line 1 | S_ADDRESS1 |
| Address Line 2 | S_ADDRESS2 |
| Town | S_ADDRESS3 |
| County | S_ADDRESS4 |
| Postcode | S_POSTCODE |
| Telephone | S_TEL |
| Fax | S_FAX |
| S_EMAIL | |
| Web | S_WEB |
| Account Number | S_ACCOUNT |